After clicking on the Settings module (1) in the left panel, the User settings window (2) will open.
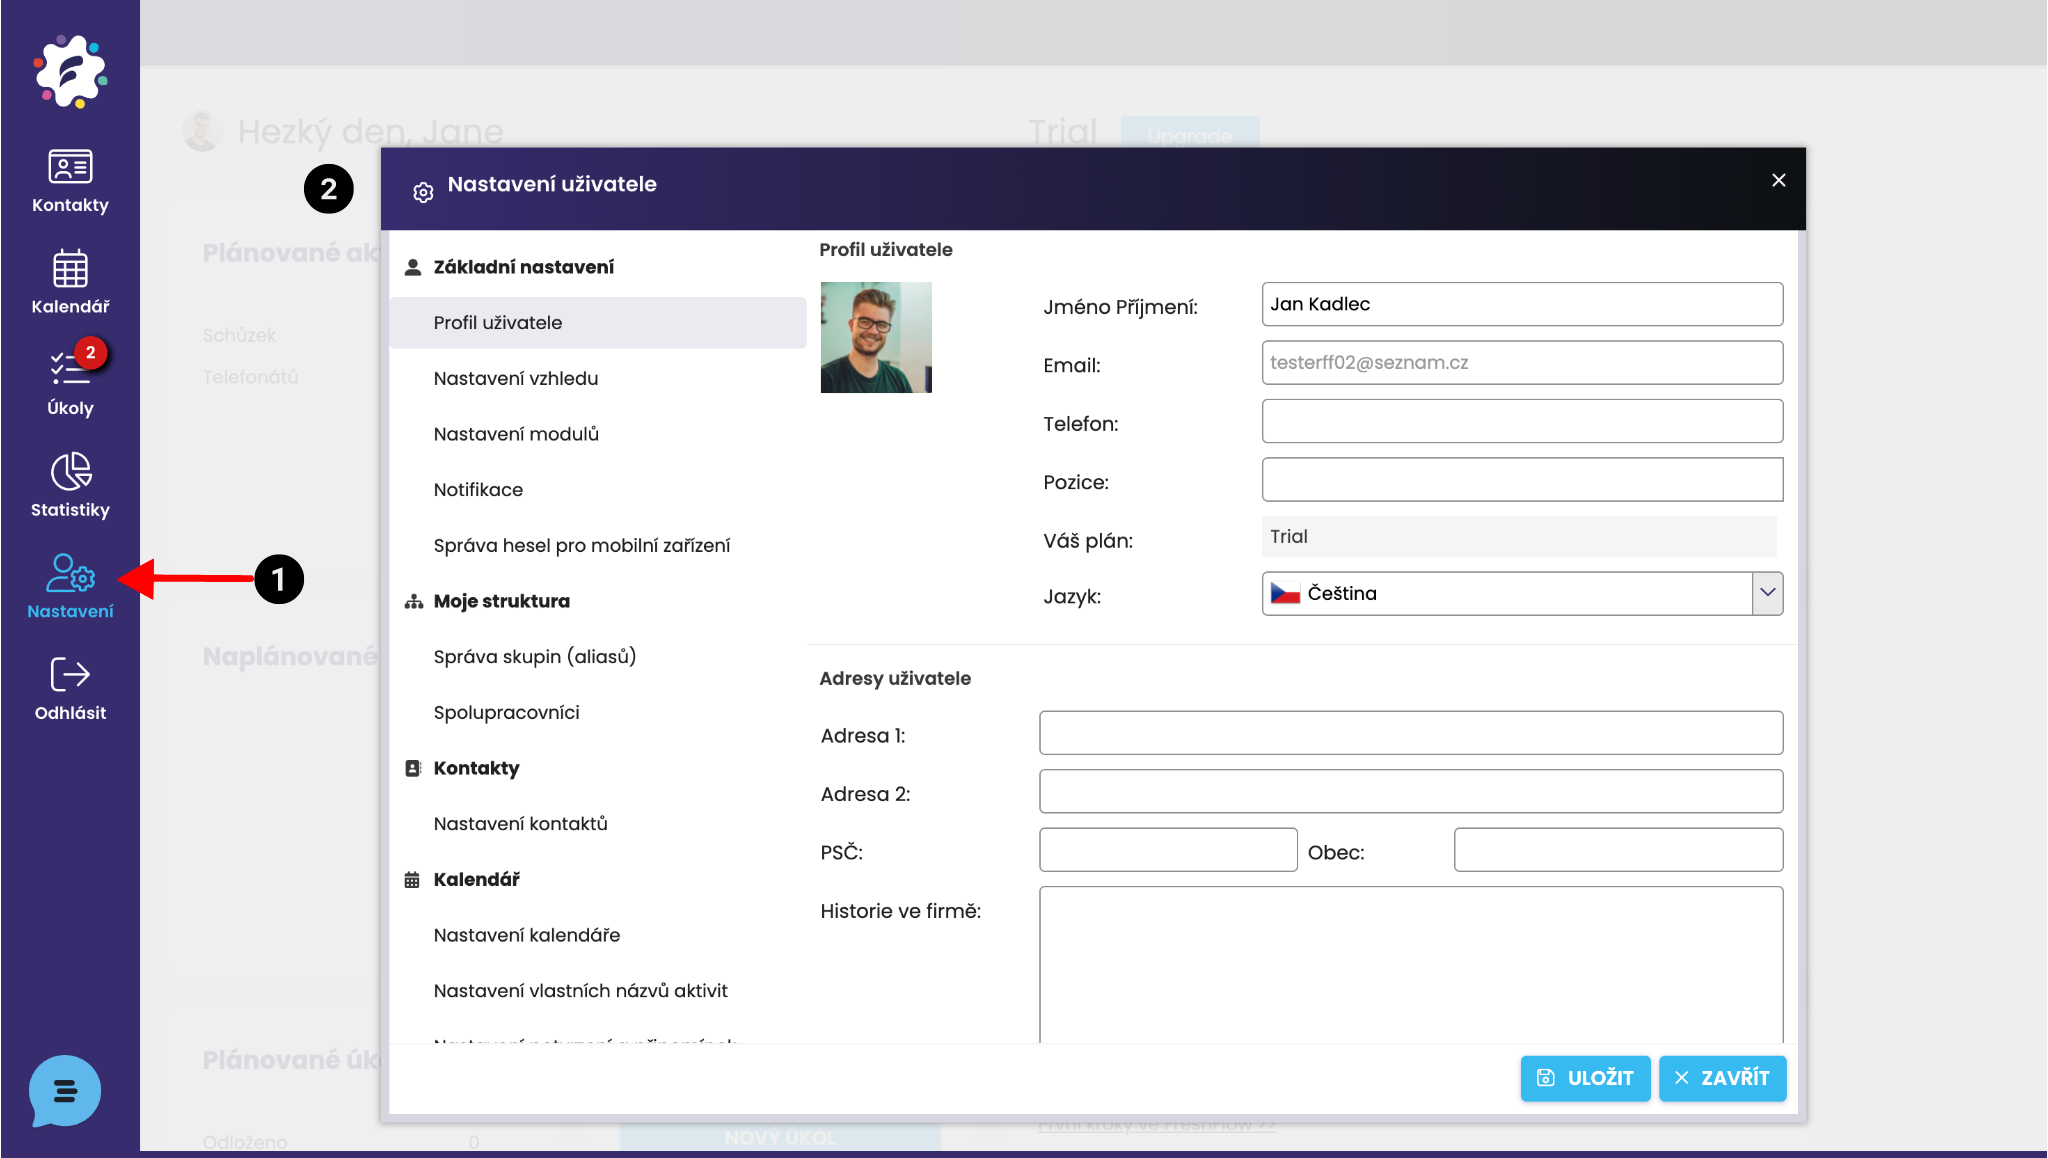
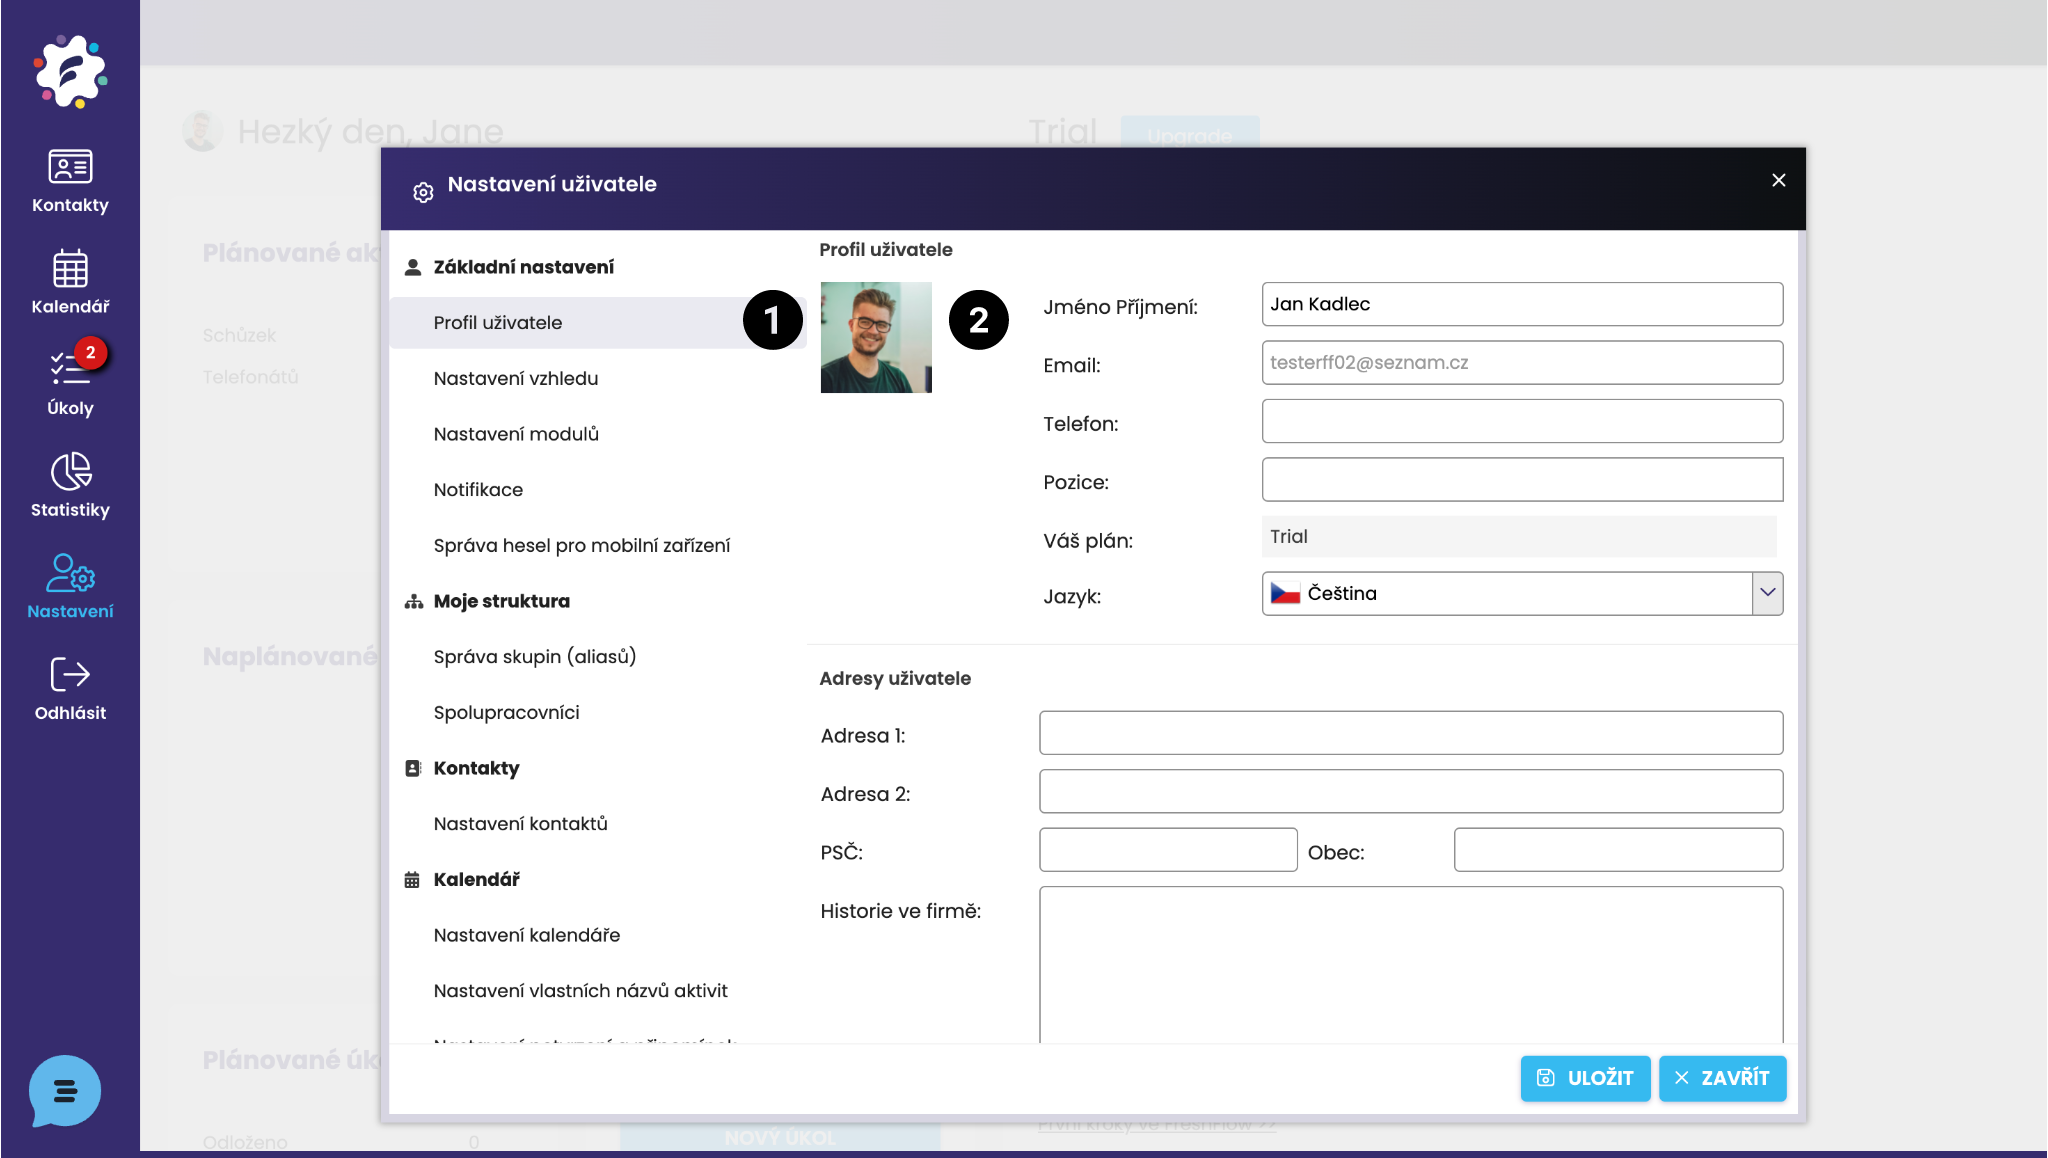
The first field is the User profile (1). Here it is possible to adjust user details (telephone, FreshFlow plan, addresses, history in the company, etc.). If you click on the image area (2), you can then upload a photograph or picture directly from your computer.
In Appearance settings (1), it is possible to customise the system display (2) – narrower rows in tables (lists) of contacts and tasks, display of a specific number of records that appear on one page (e.g. the number of contacts in the list per page), or displaying automatic formatting in notes (for tasks or activities).
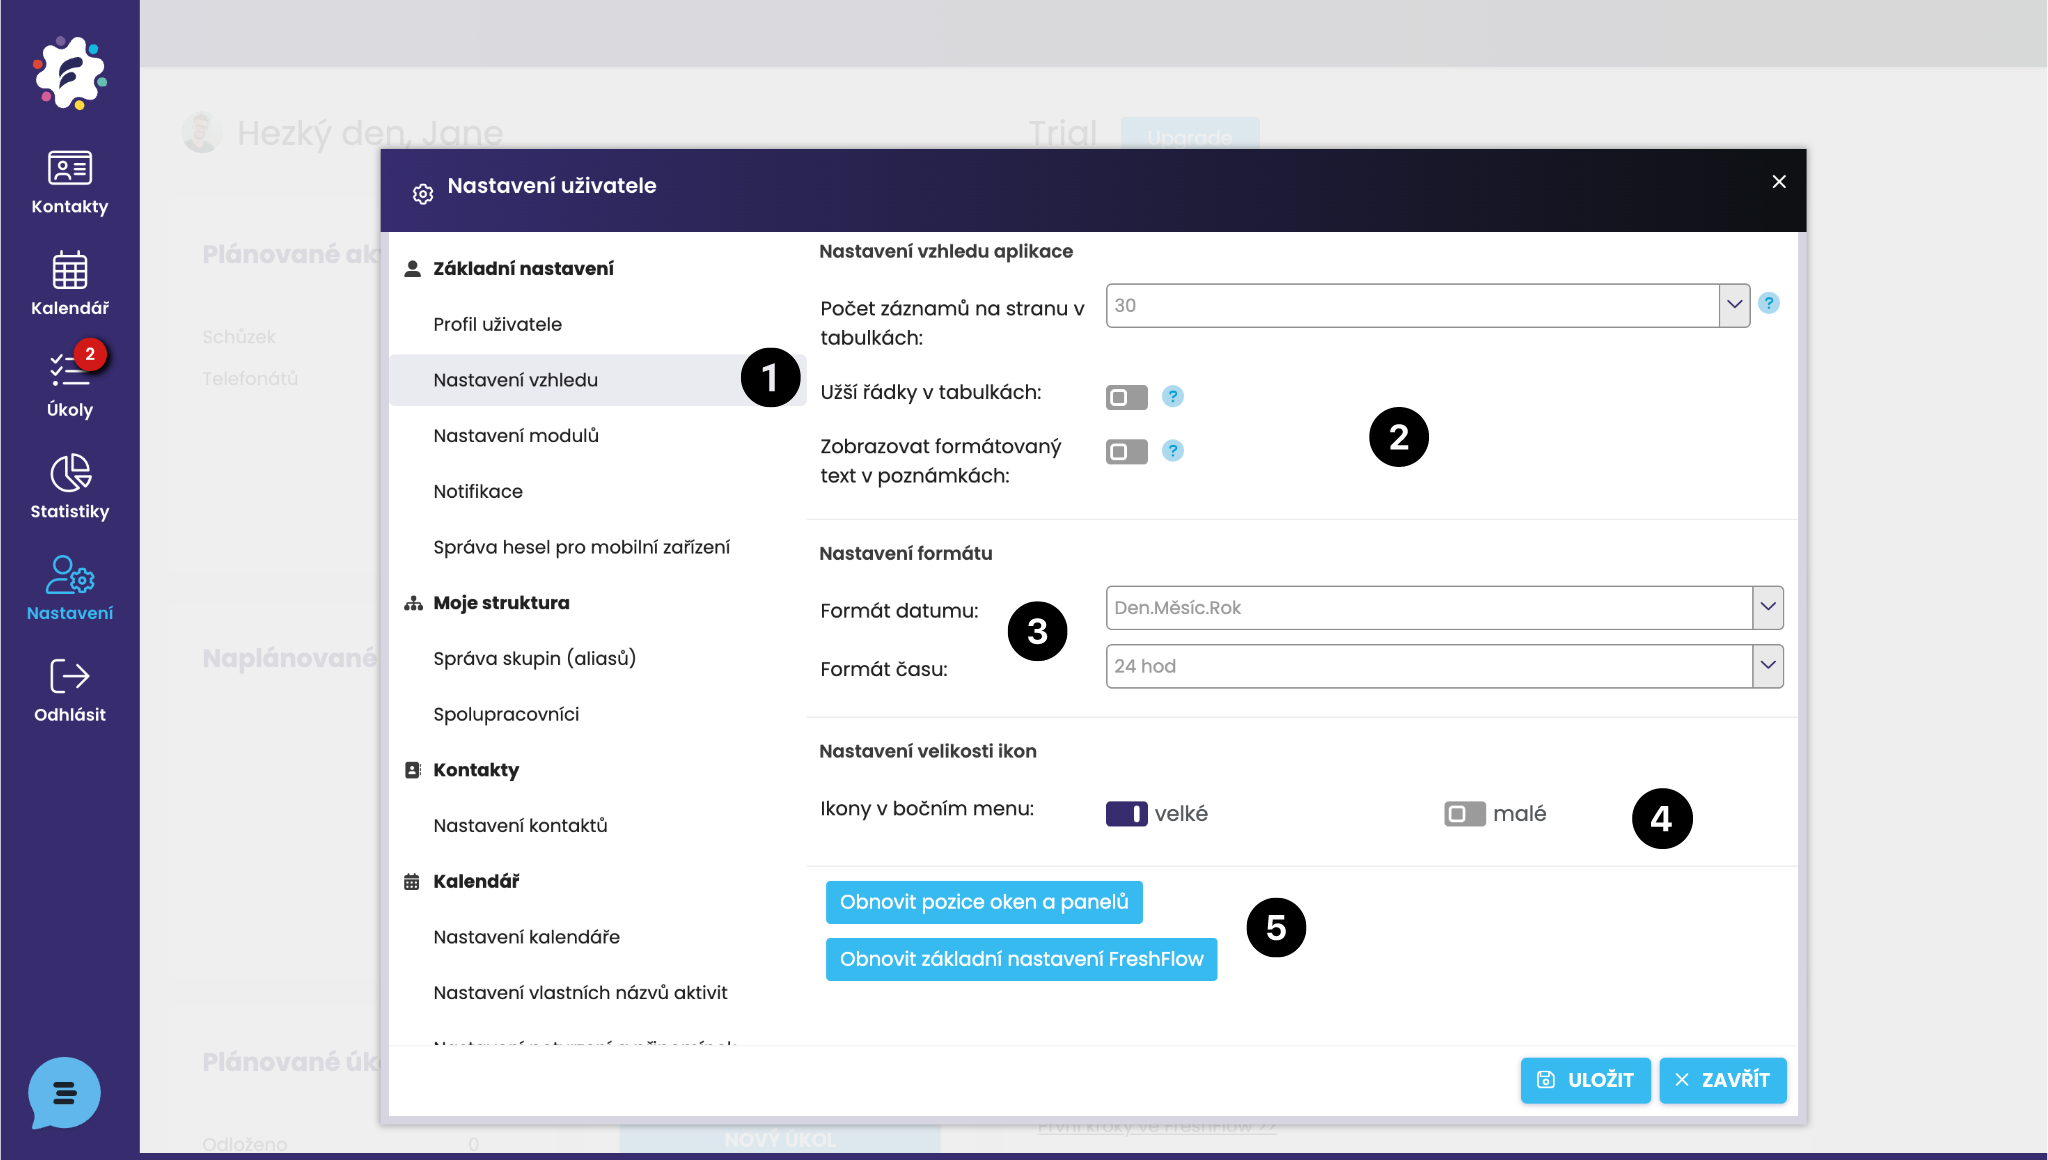
You can also set the date and time display format (e.g. European, American, or 24‑hour x 12‑hour time) (3).
Icon settings (4) – choose whether you want the icons in the left sidebar (Contacts, Calendar, etc.) to be displayed large with labels, or only as small icons without labels with a narrower sidebar.
Restore default values (5) – Restore the positions of windows and panels (if you have customized them), or directly Restore basic FreshFlow settings (reverts to default values).
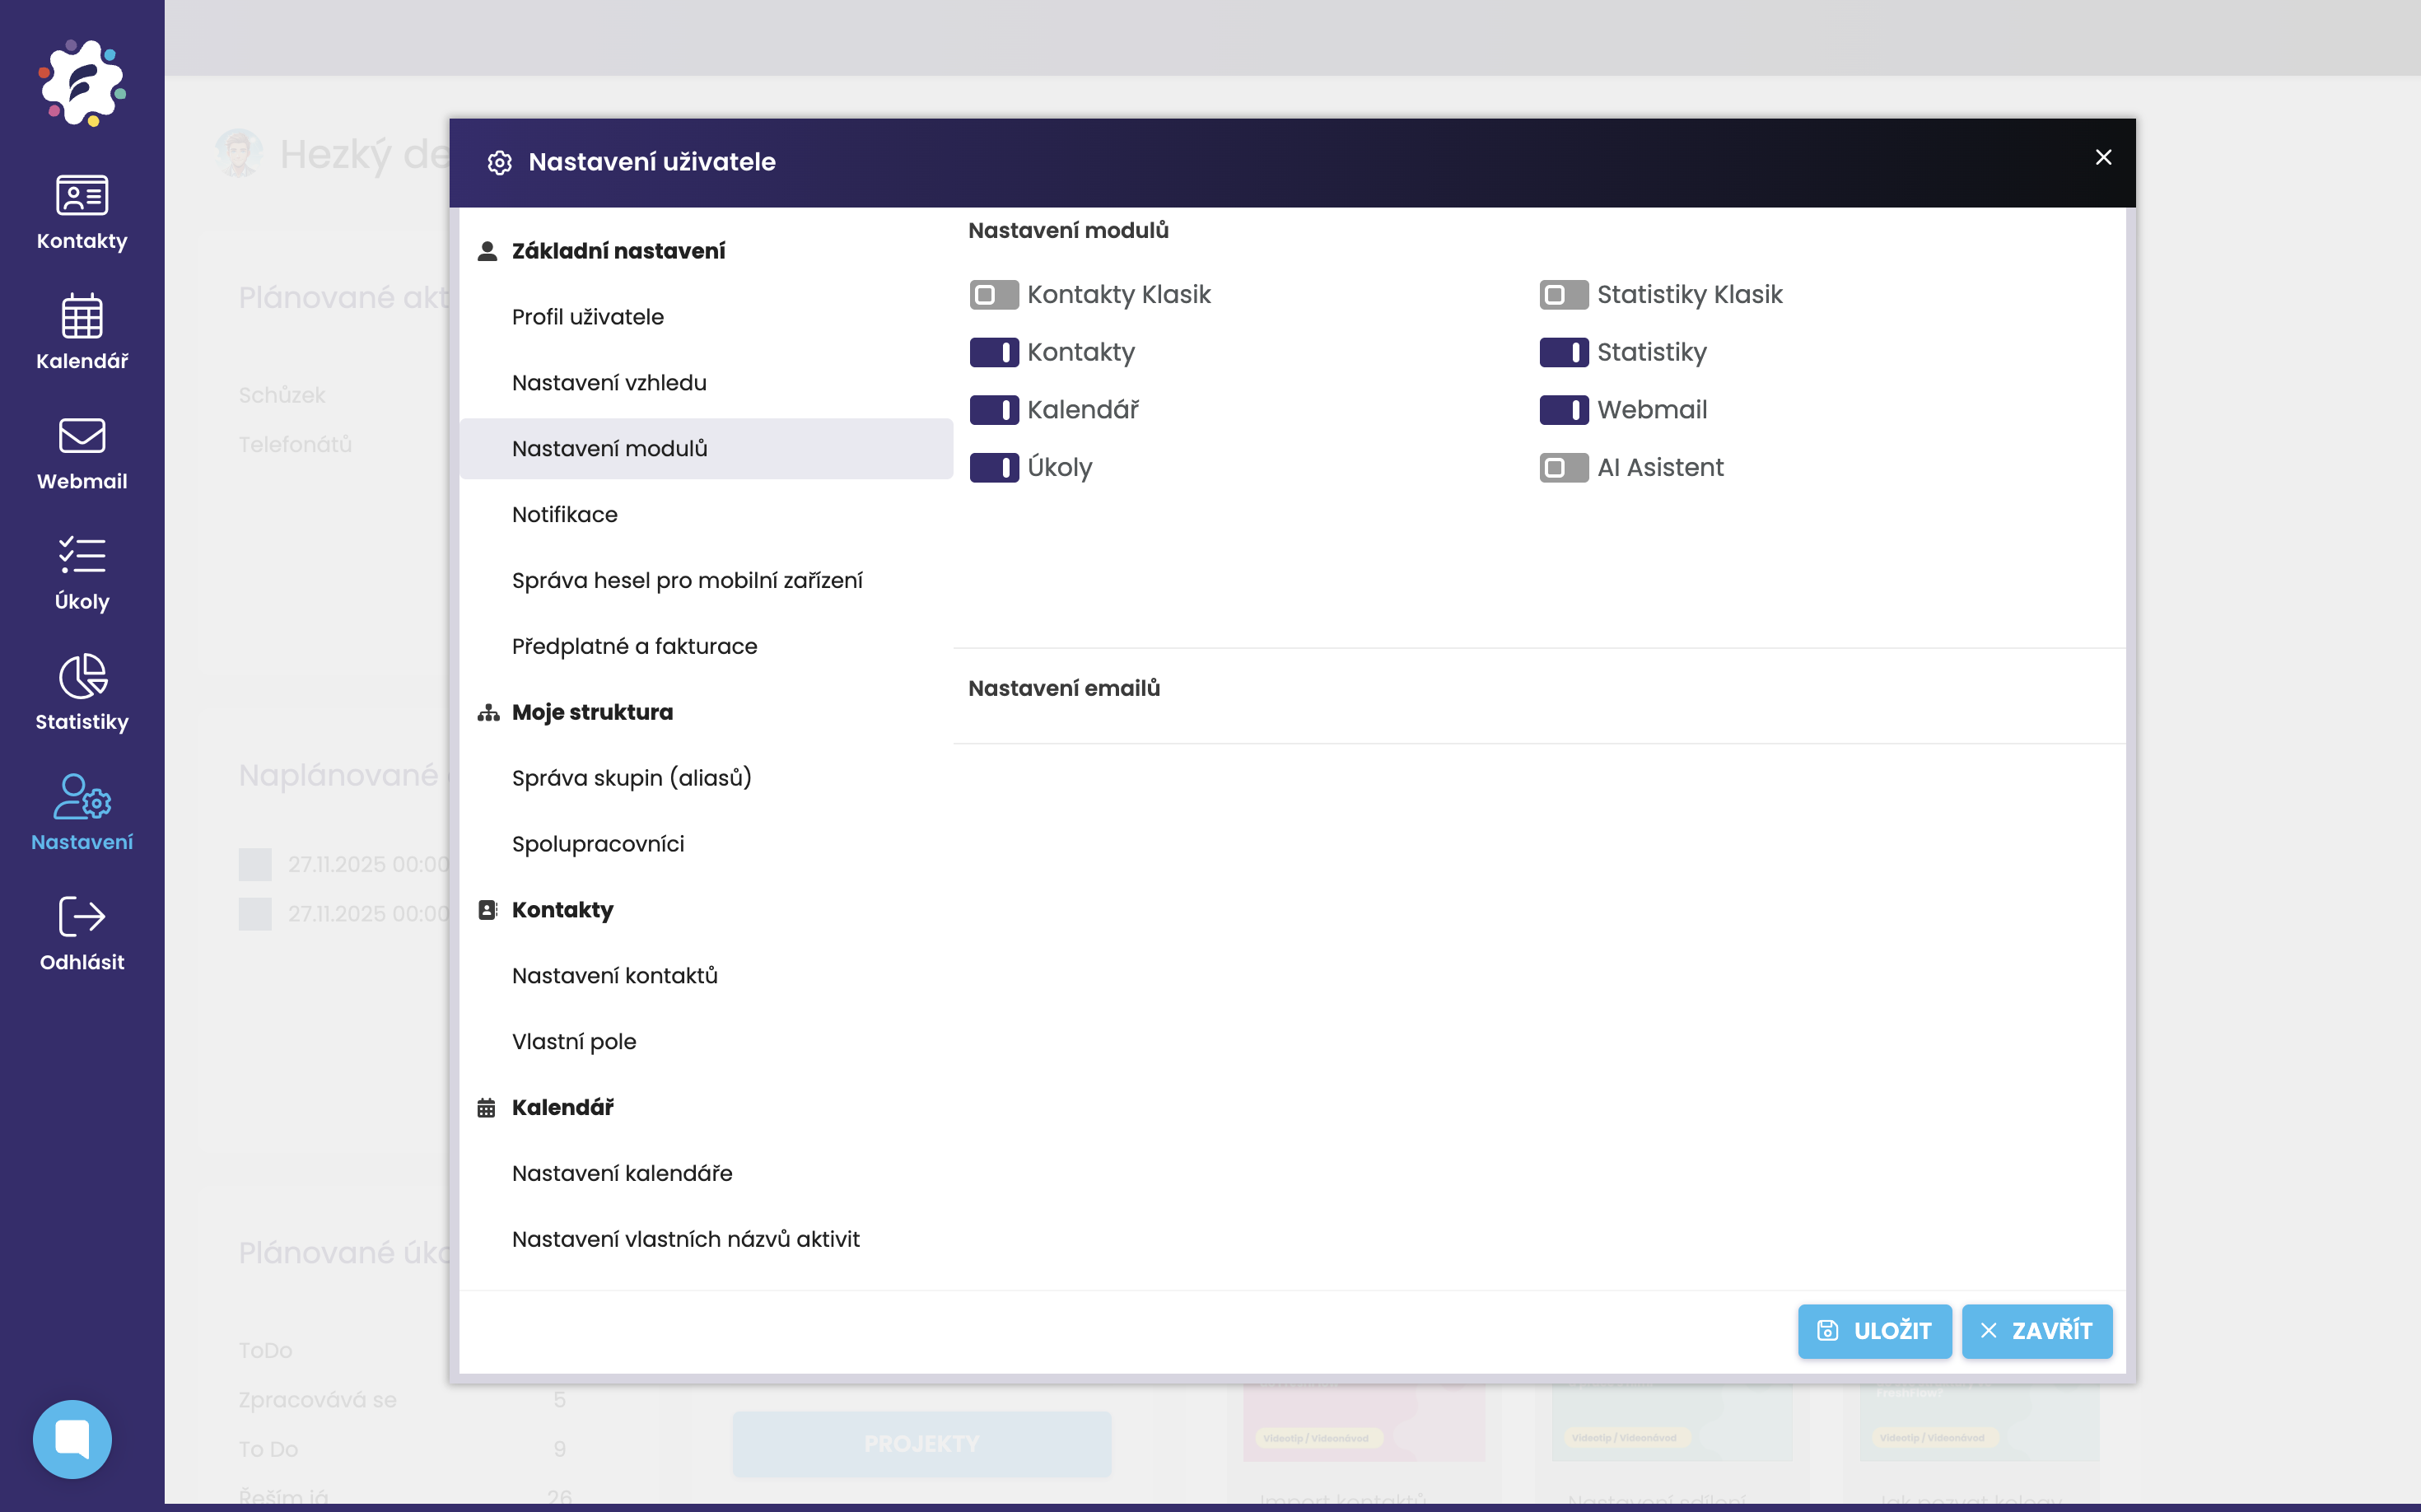
In the Module settings section, you can choose which modules you want to hide and which you would like to keep available. For example, the Webmail module or the AI assistant is not enabled automatically after registration and must be activated in order to be used.
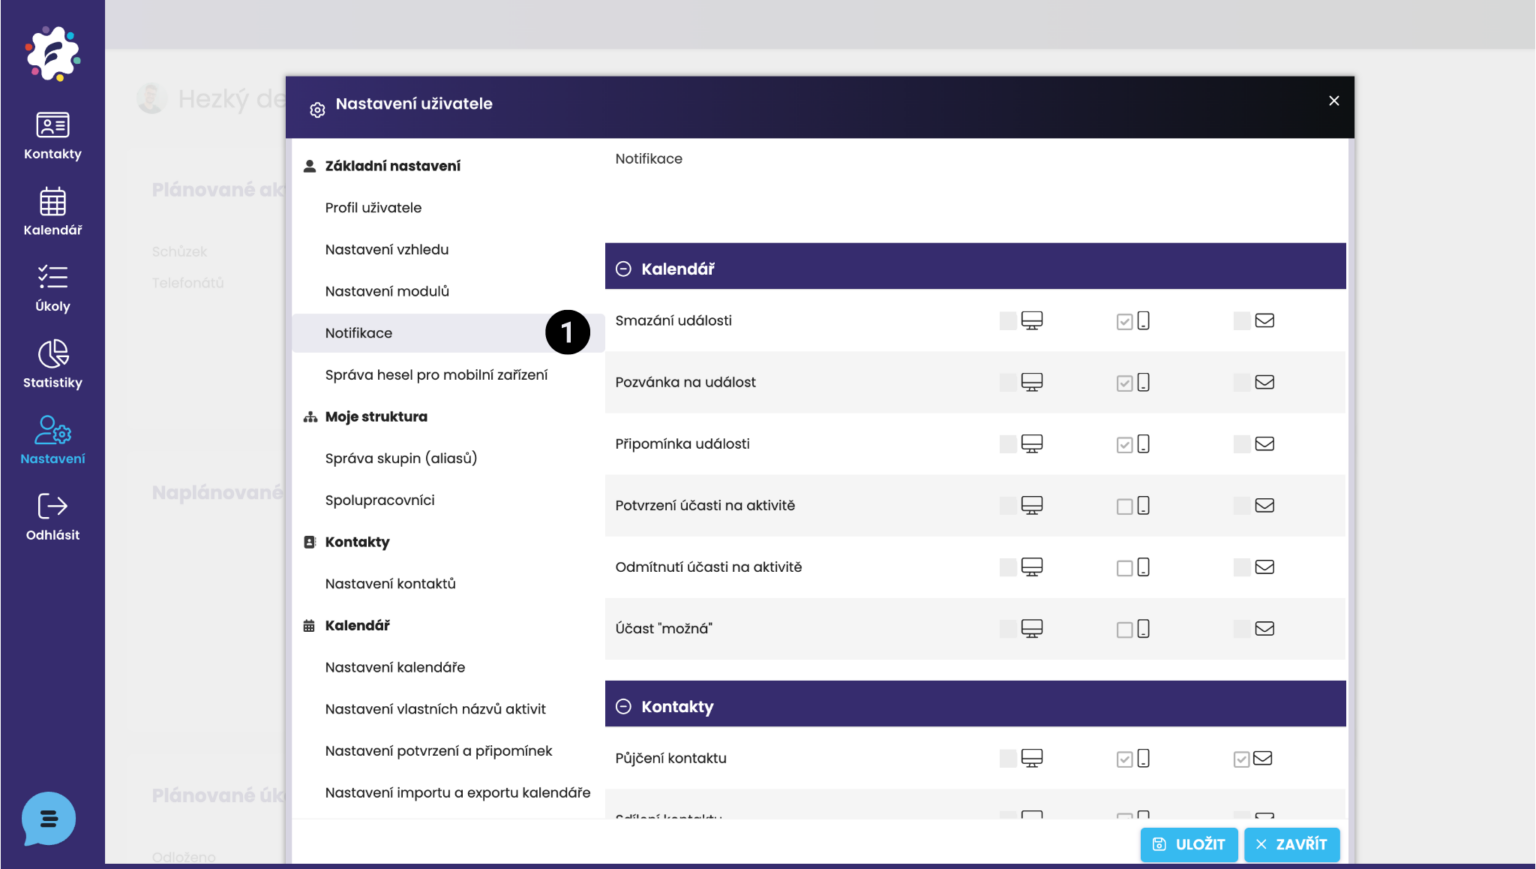
In the Notifications section (1), you can configure which notifications you wish to receive in the web application, in the mobile application, and by email.
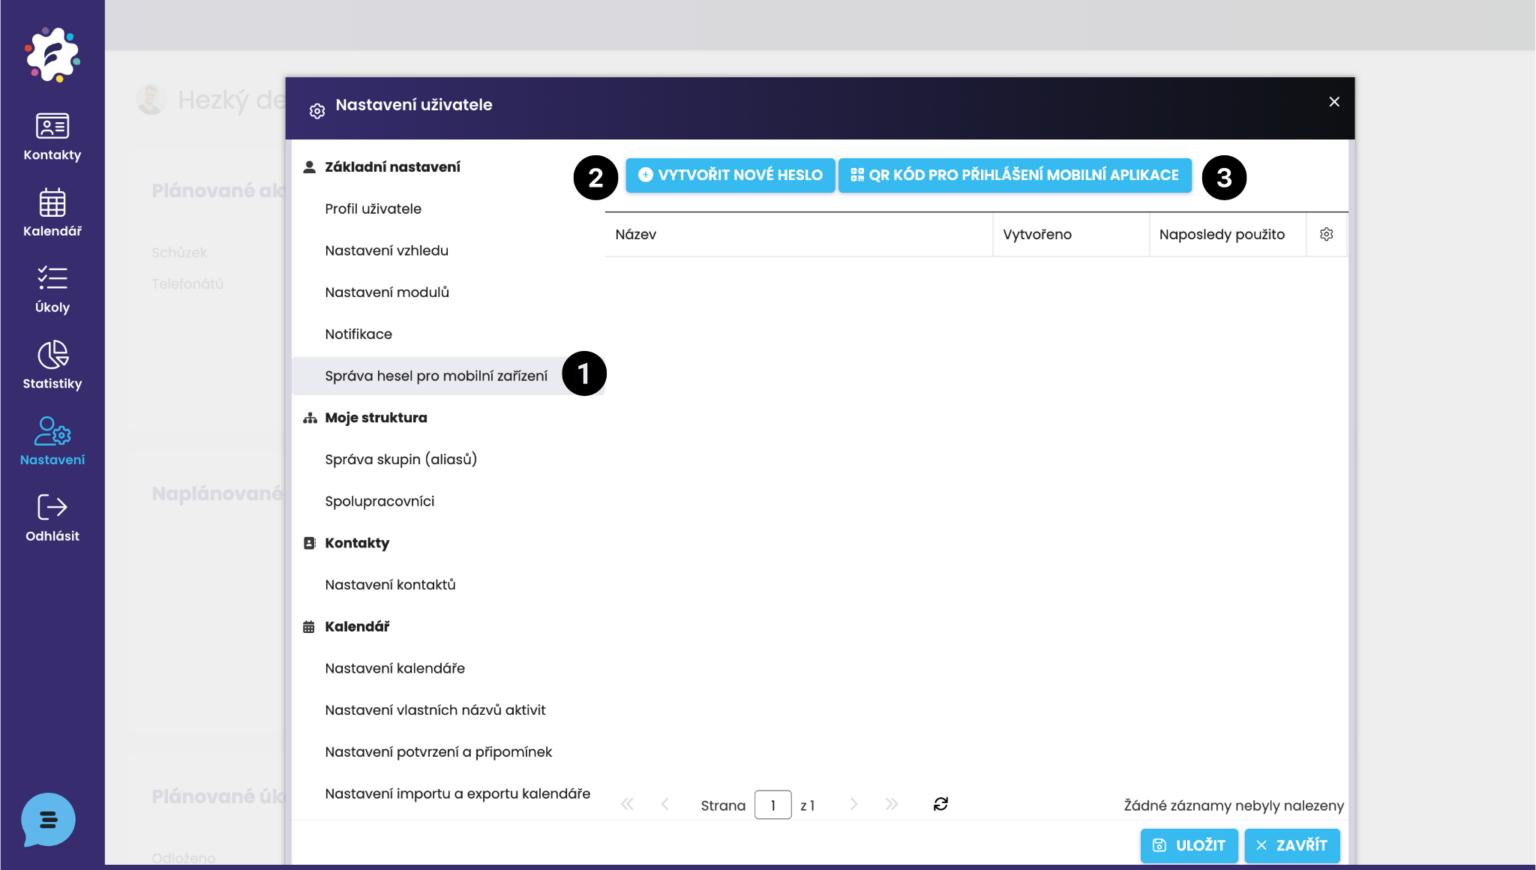
In the Password management for mobile devices section (1), you have the option to create a password that you will use for the mobile application (2).
At the same time, you have the option to generate a QR code for logging in to the mobile application (3). In the mobile application, simply click on “Login via QR code”, scan the generated QR code in the FreshFlow web application, and you will be logged in to the FreshFlow mobile application.
In Password management (1), it is also possible to see a list of passwords created so far (for mobile devices) and to delete existing passwords.
We cover logging in to the mobile application in more detail in a separate article: HERE
You can find a separate article on the procedure for paying for FreshFlow HERE.
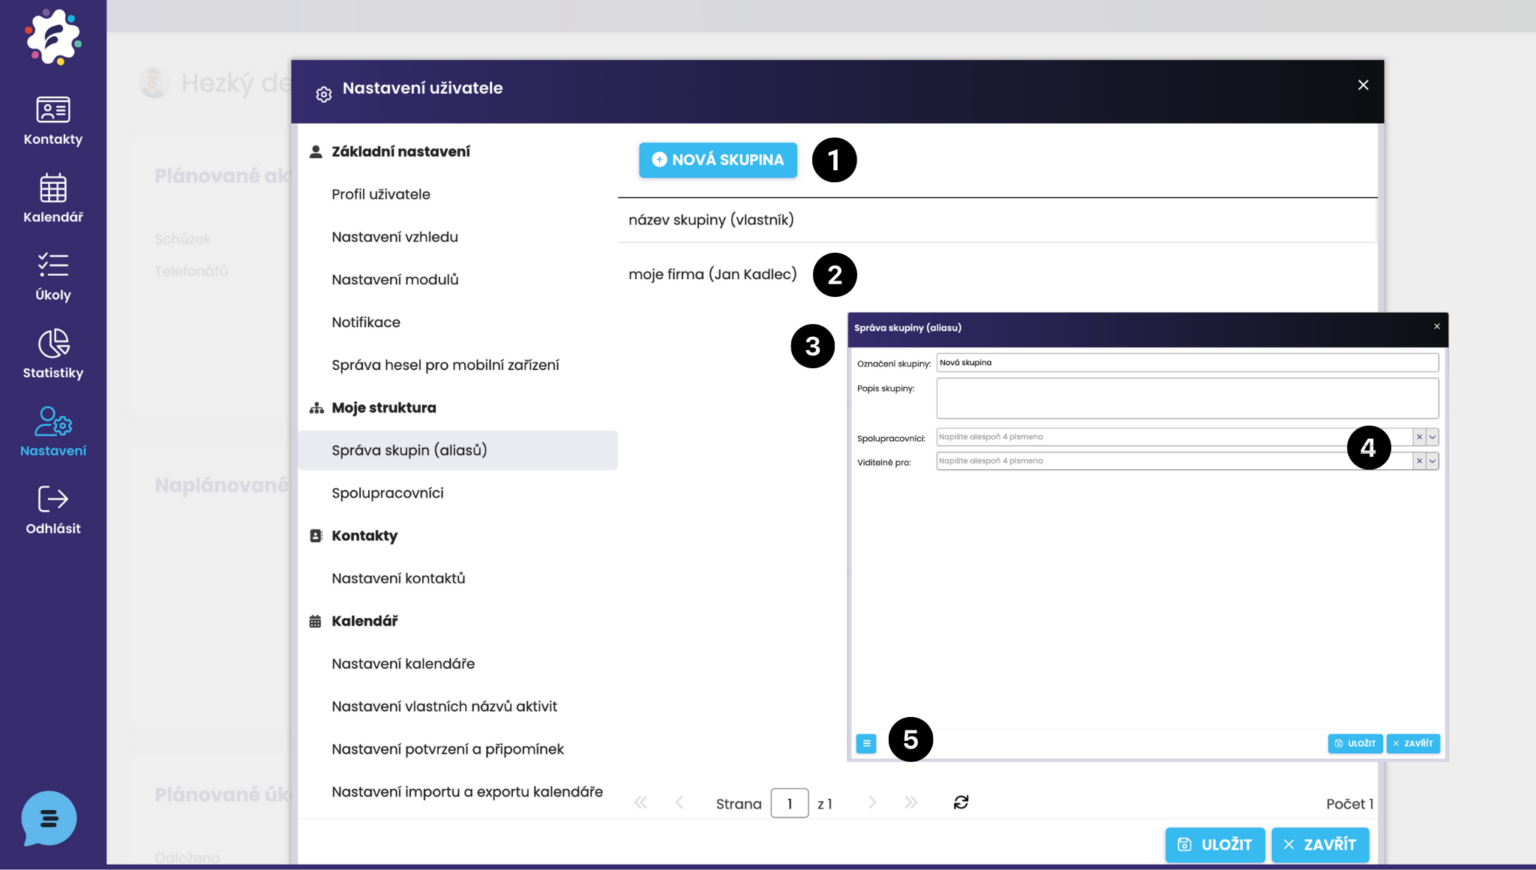
Group management – here you can create new groups (1) or edit existing ones by clicking on the group name (2). A dialog window Group management (3) will open. Here you can modify the required settings, add collaborators and visibility (4), and click Save. If you wish to delete a group, click on the three-lines icon at the bottom left (5) and select Delete.
Groups and their use are covered in a separate article HERE
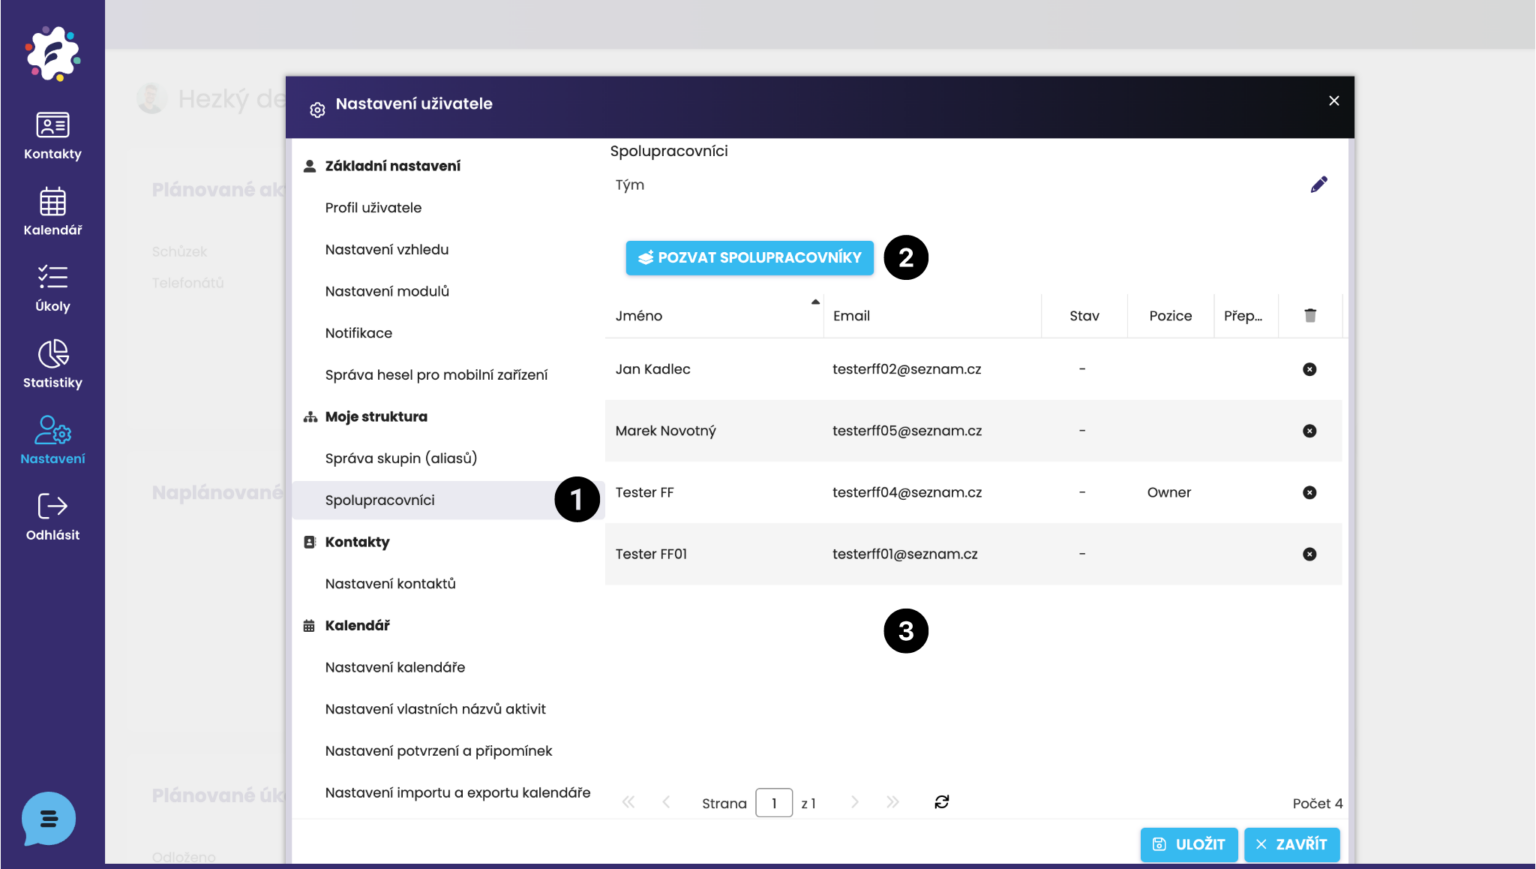
In the Collaborators (1) section, you have the option to add colleagues to your structure in FreshFlow for the joint use of shared functionalities (e.g. Calendar sharing, Joint participation in activities, etc.).
After clicking the Invite Collaborators button (2), a window will appear where you enter the user's email address and send the invitation. The invitation will be delivered to the given user by email, from where they can accept it.
ATTENTION: it is not possible to add a user who is already part of another structure.
The new collaborator will then be displayed to you in the list of collaborators (3).
You can find tutorial videos on adding users to the structure HERE.
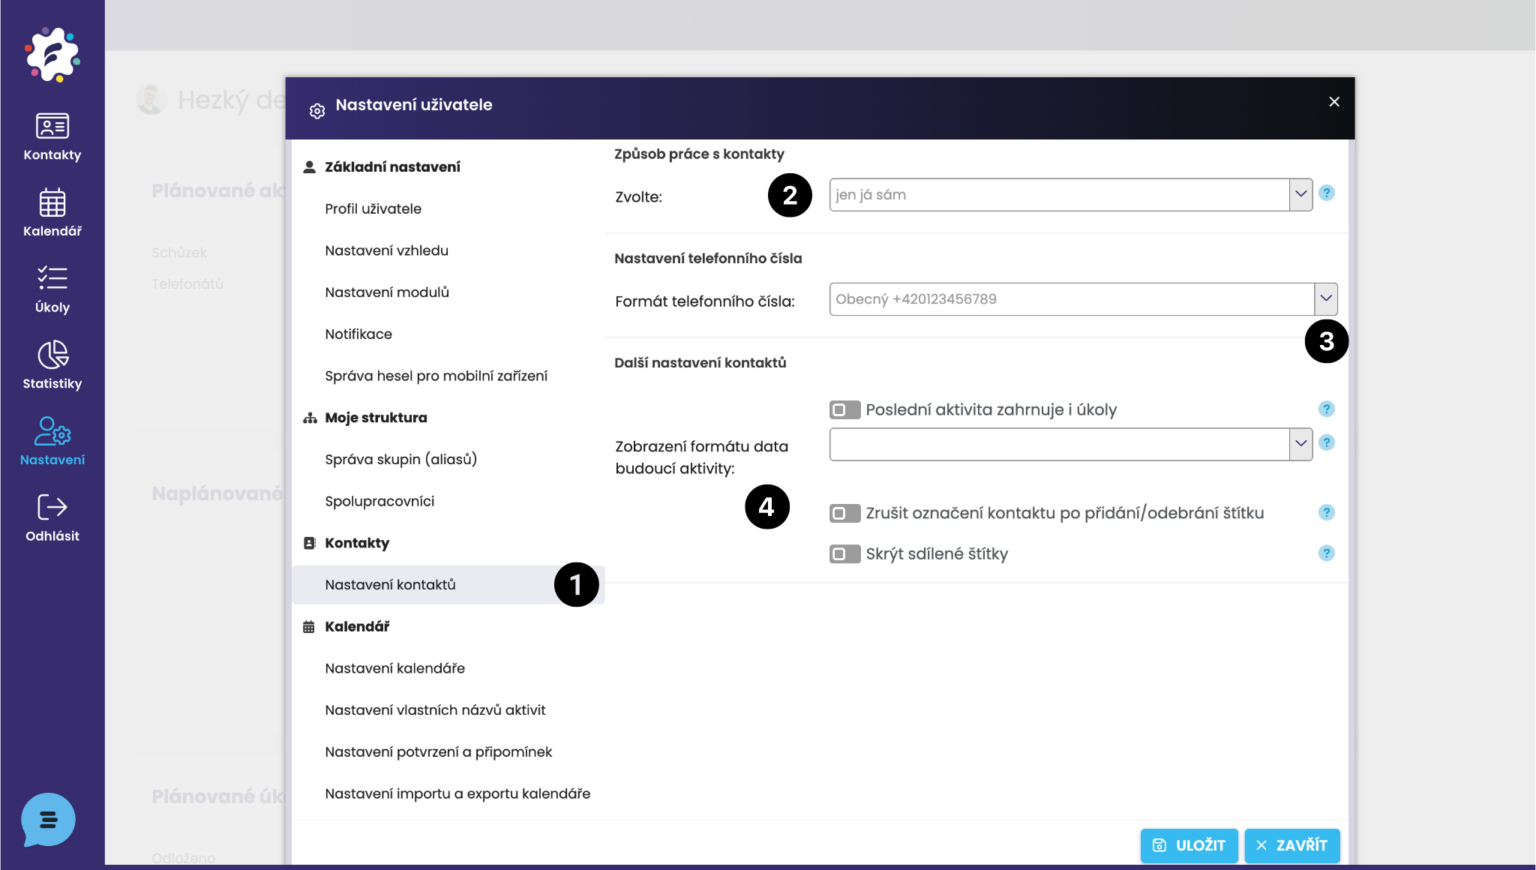
In this field (1) you can set how you will work with contacts (2):
By selecting the option "Only myself" you will see only your own contacts that you enter into FreshFlow or that someone shares with you.
The second option is "everyone in the company" – you will see (and can work with) contacts in the entire structure below you.
Here you can set the phone number format. If you work only with Czech numbers, we recommend selecting the International format, as it is able to create spaces between digits, even if you enter the phone number into FreshFlow as one continuous string.
You can also configure various display options in the Contacts module, such as displaying a task as the last activity in the contact database overview, or selecting the date format for a future activity (e.g. full date or a format indicating in how much time the activity will take place).
We cover how to create custom fields in a separate article HERE.

You can adjust the visible time range of the calendar from – to a specific hour (1).
Length of the calendar time interval (2) – choose whether you want to see the calendar in 15, 30 or 60 minute intervals.
Event grouping (3) – define whether activities taking place at the same time will overlap in the calendar, or be arranged side by side (grouped).
In Calendar Settings, you can turn the display of activity names (e.g. Phone call, Meeting..) (4) on and off.
(5) If you decline an invitation to an event, it will still remain in your calendar.
Enable accelerated activity selection (6) – method of entering activities into the calendar -> you do not need to fill in the type of activity and the activity separately. Tasks can also be entered in this way. (First, a window will appear where you fill in the type of activity, and possibly also the specific activity (from a selection of the most recently entered ones).
(7) If you change the time of an activity, the system will automatically retain the original time interval (e.g. if the original time interval of the activity was 2 hours, the edited time of the activity will also be 2 hours).
In the module for setting custom activity names, you can modify predefined types of activities, activities, and their outcomes according to your needs. Thanks to the predefined activities and outcomes, the system is able to generate valuable statistical data.
We cover the process of setting custom activity names in detail HERE in a separate article and video.
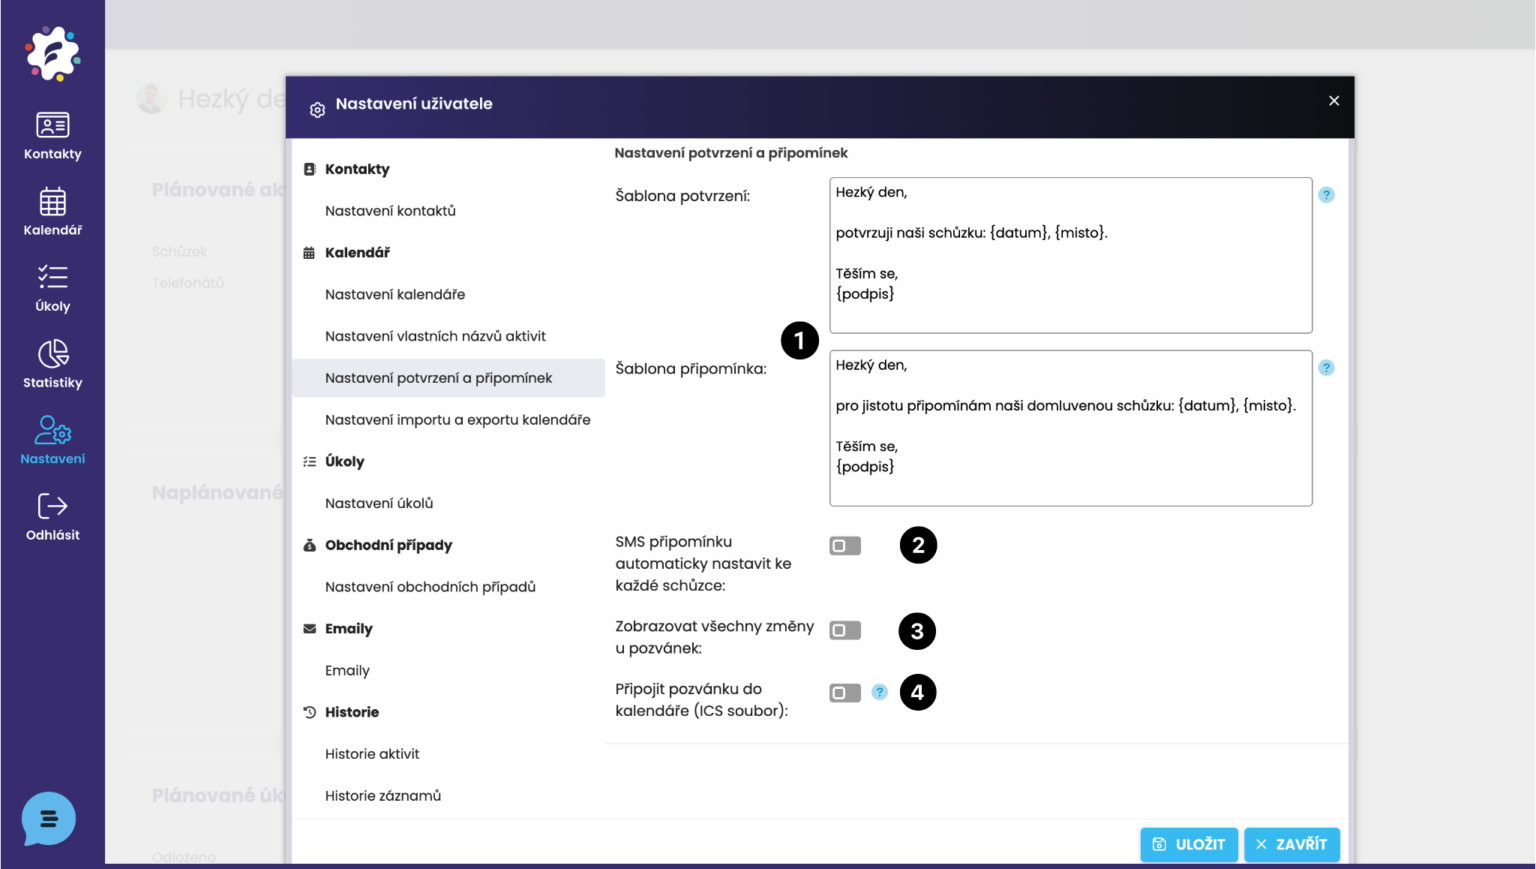
(1) Appointment reminders and confirmations for clients – templates – here you can edit the default text of the templates that are subsequently sent to clients when you set a confirmation or reminder for an activity. You can edit the confirmation and reminder text for a specific event directly in the event card.
(2) An SMS reminder will be sent for each appointment.
(3)
(4) The invitation will be sent as an attachment to the email and, once opened, will be automatically added to the client’s calendar.
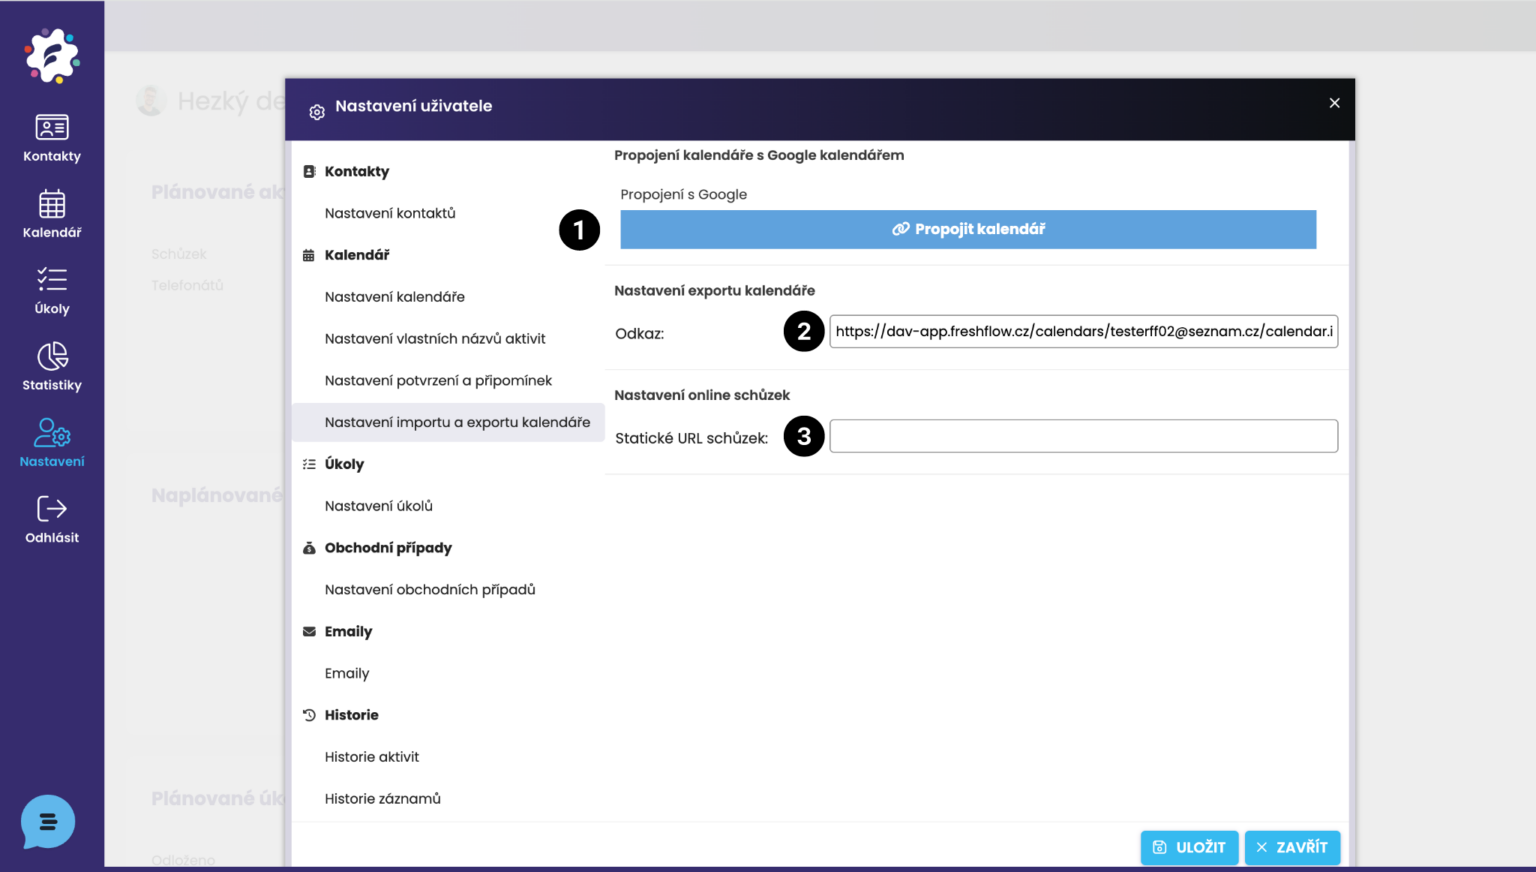
(1) Link for connecting the FreshFlow calendar with Google Calendar.
You will use the link for calendar export (2) in cases where you need to back up data from the calendar or connect it with another calendar.
How to create custom fields is covered in a separate article HERE.
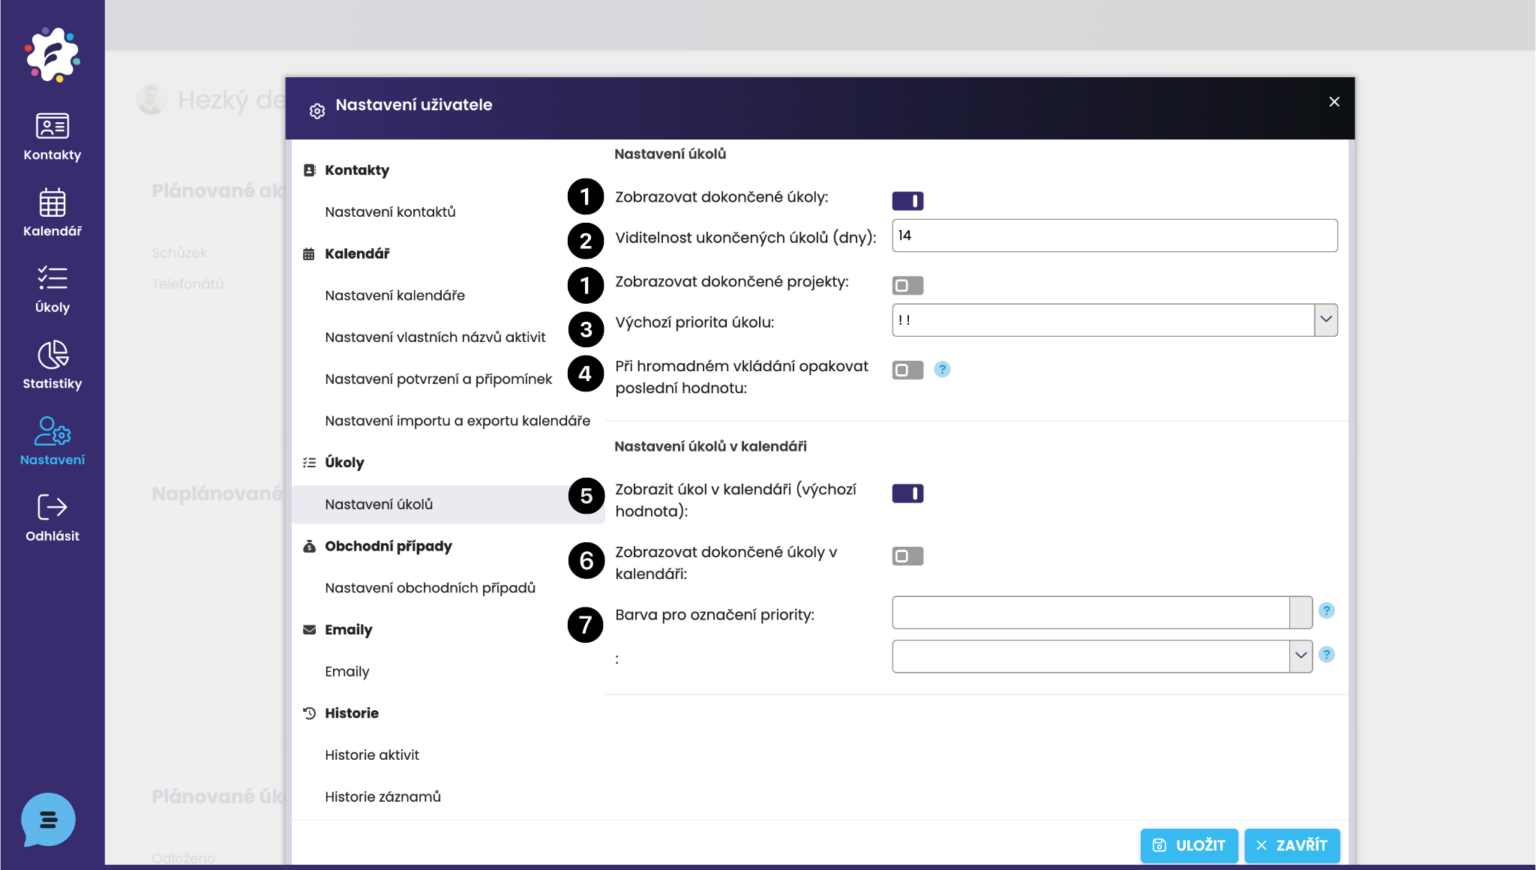
(1) Display completed tasks/projects – if you wish to have completed tasks/projects permanently displayed in the tasks module, check this option.
(2) Visibility of completed tasks – if you wish to display completed tasks only for a certain period after their completion, set it here.
(3) Default task priority – you can set what should be pre-filled by default.
(4) If you are entering multiple tasks in succession – you can enable “repeat last value”, i.e. the same contact (client) and possibly the project in which the tasks are being created will be inserted automatically.
(5) Display task in calendar – sets the default value for a new task (it can then be adjusted individually for each task).
(6) Display completed tasks in the calendar – again, this can be set as a default value and, if necessary, adjusted individually in the detail of each task.
(7) Priority – set the color and style of the priority label in the task – this will then be reflected in the tasks displayed in the calendar.
How to create custom fields is covered in a separate article HERE.
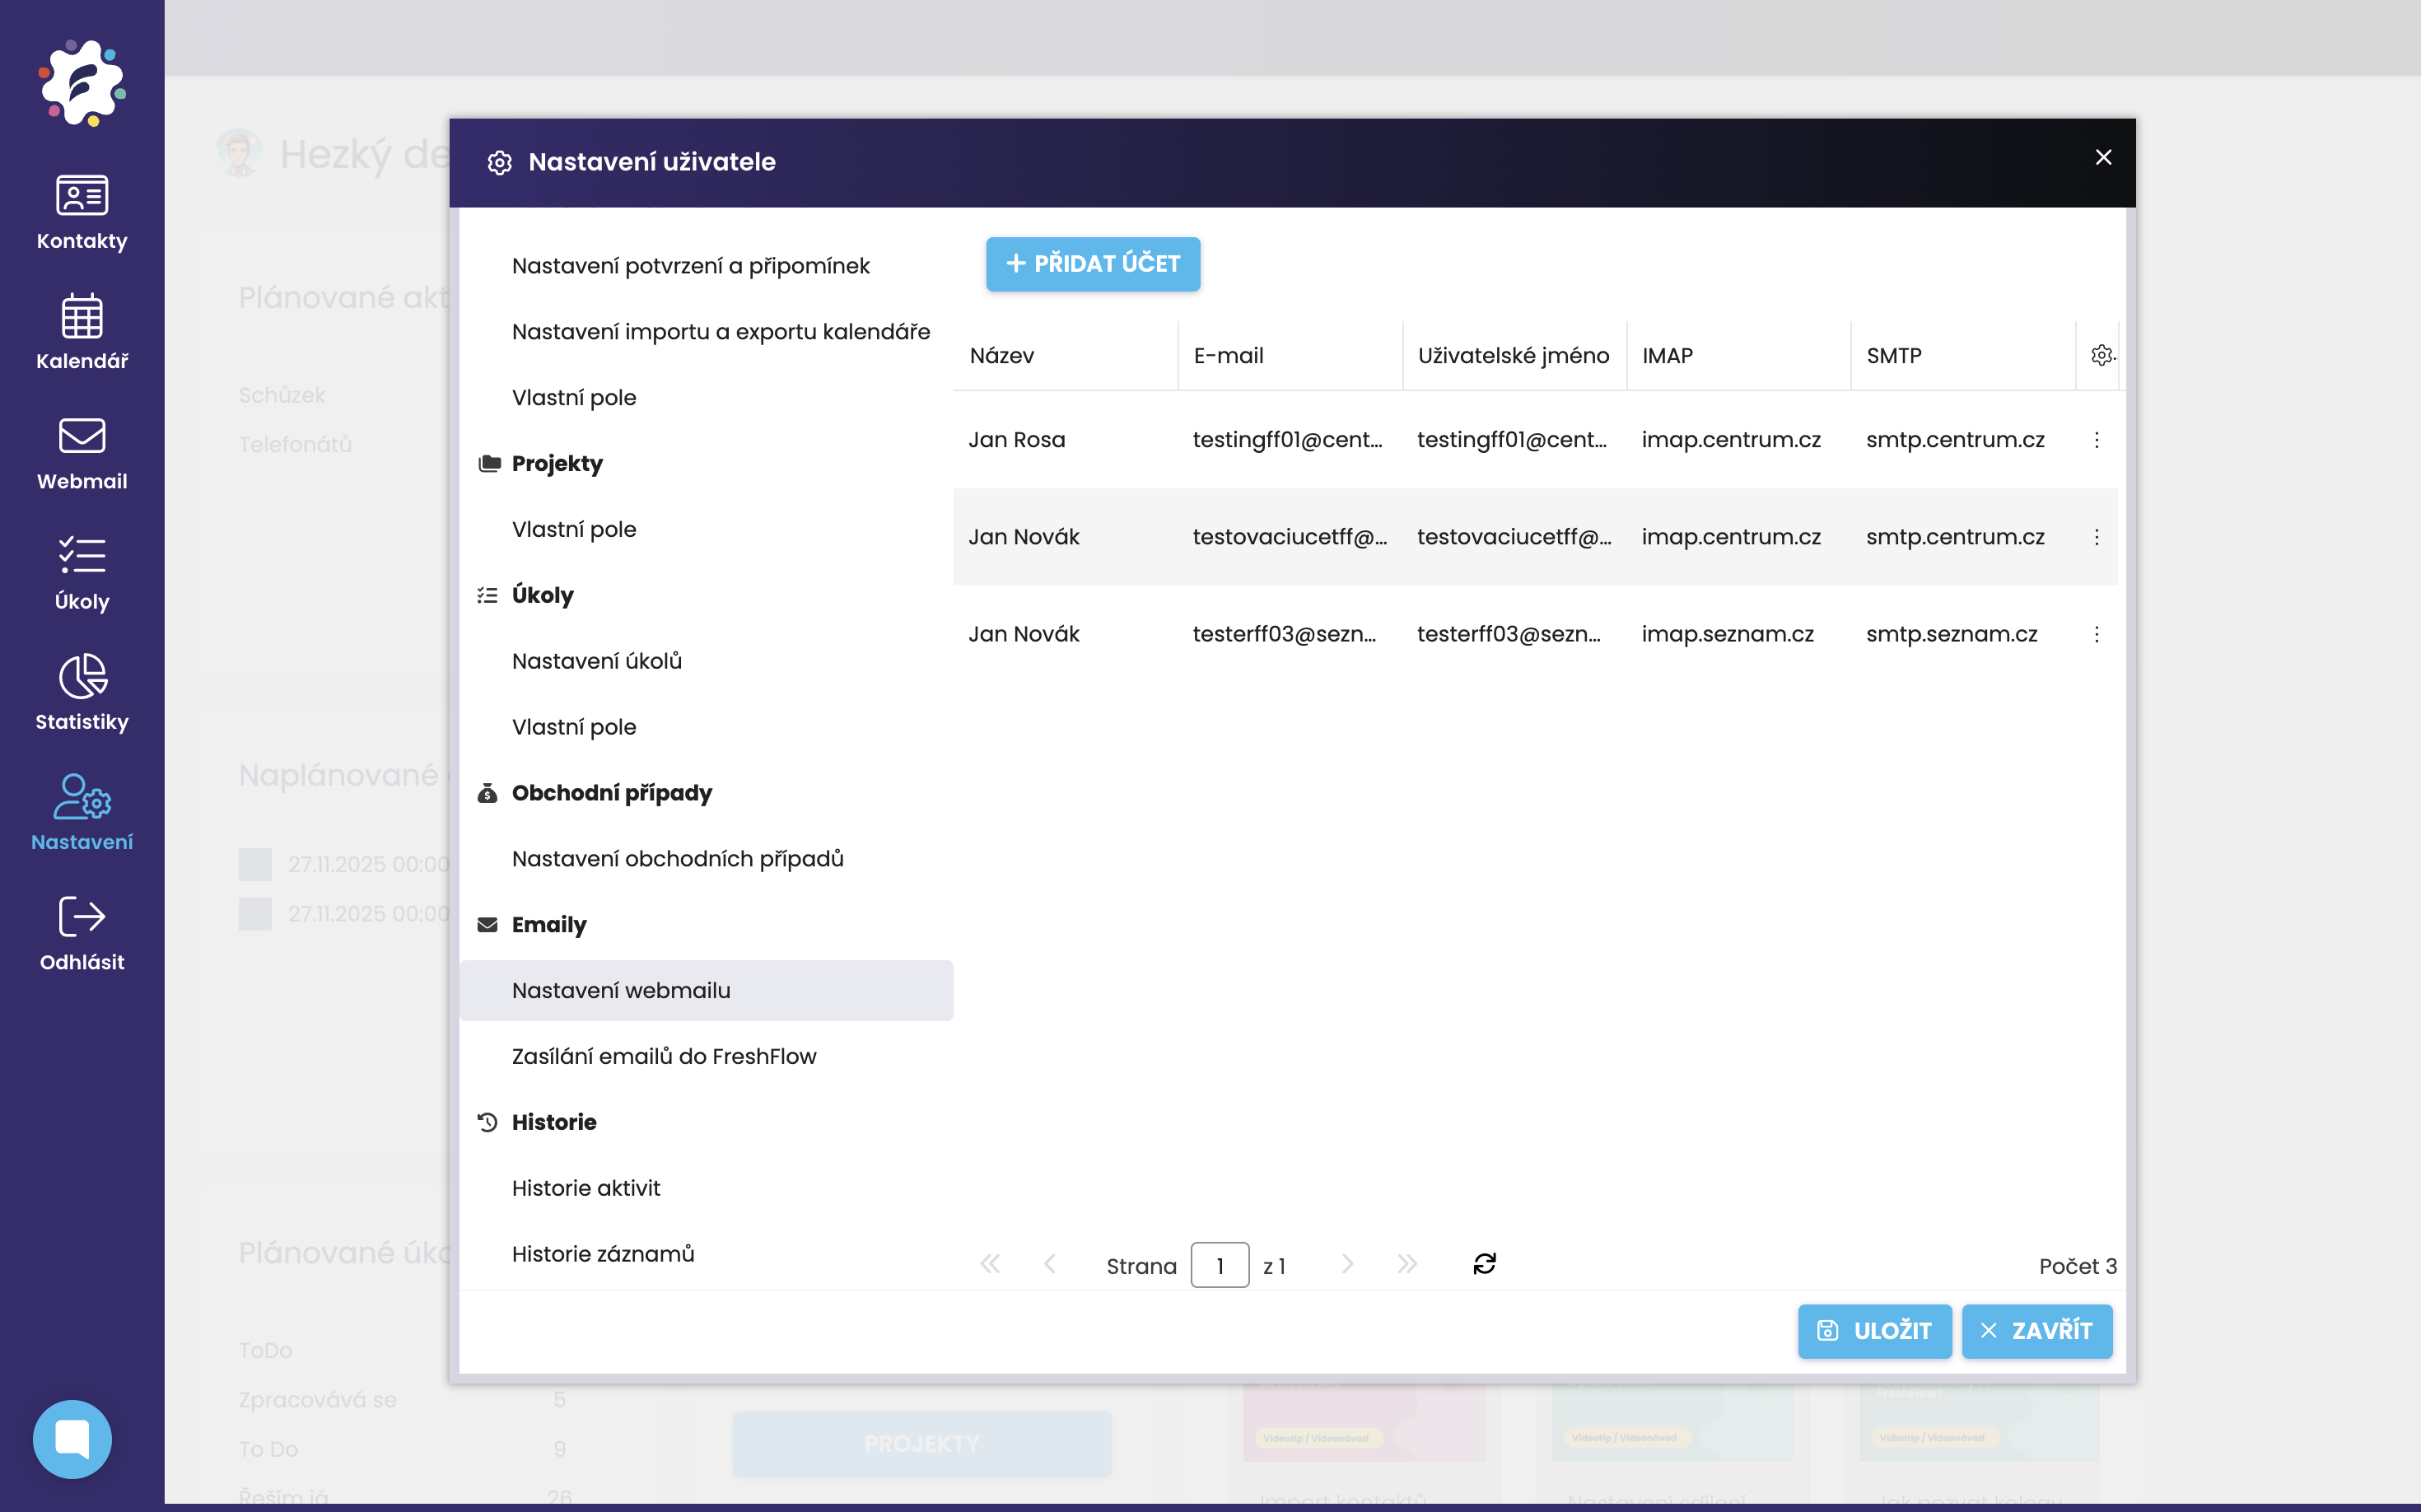
This field is used to connect an email inbox to FreshFlow. The procedure can be found in a separate article HERE.
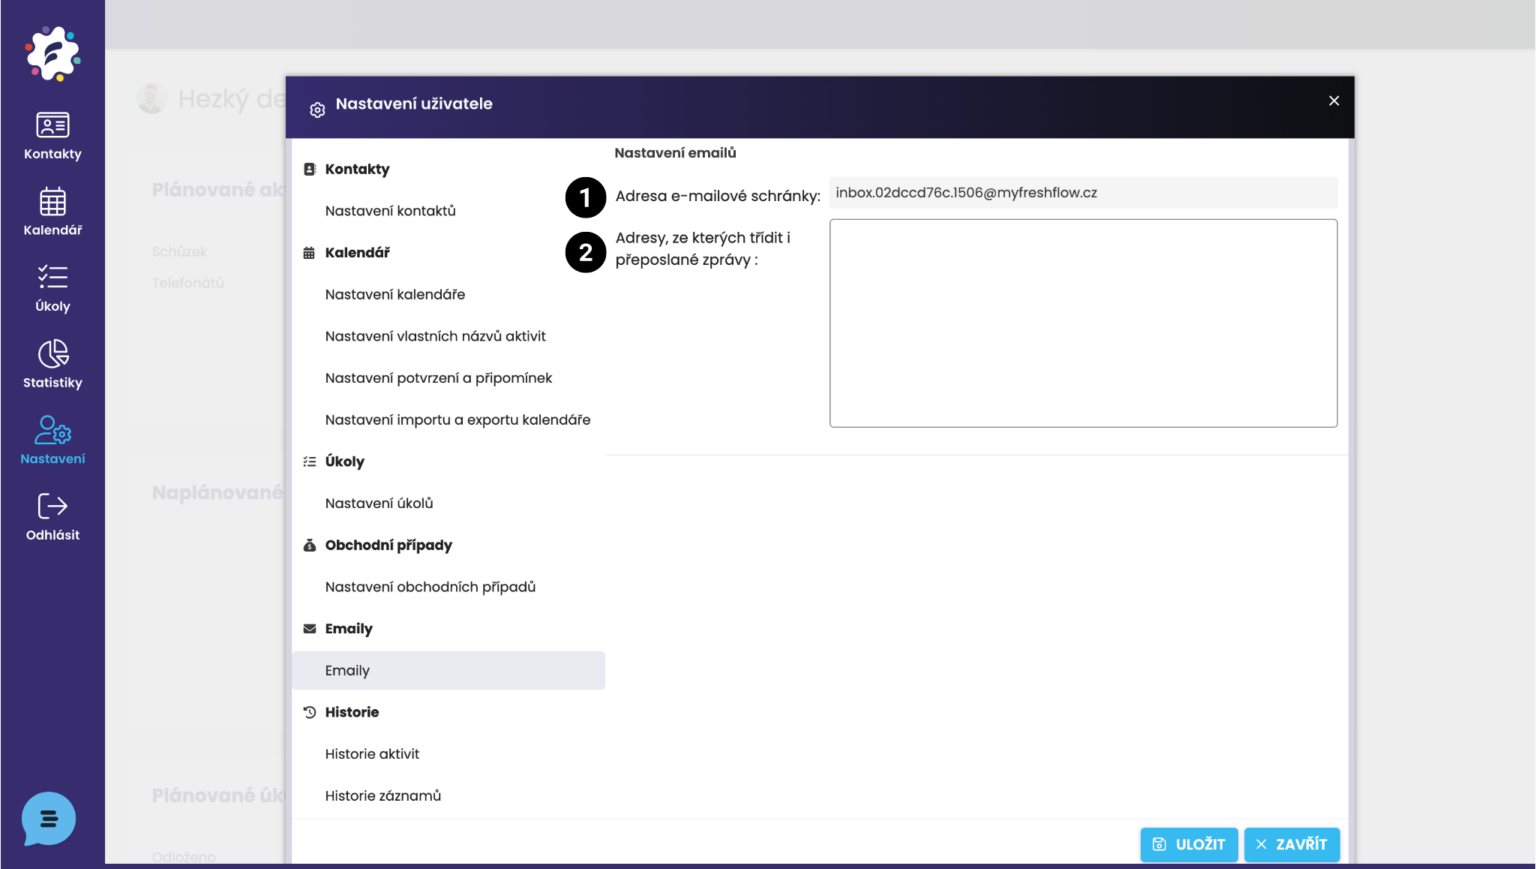
(1) Your FreshFlow address to which you can forward emails, thereby assigning them to the client, to their card in the CRM Light solution FreshFlow.
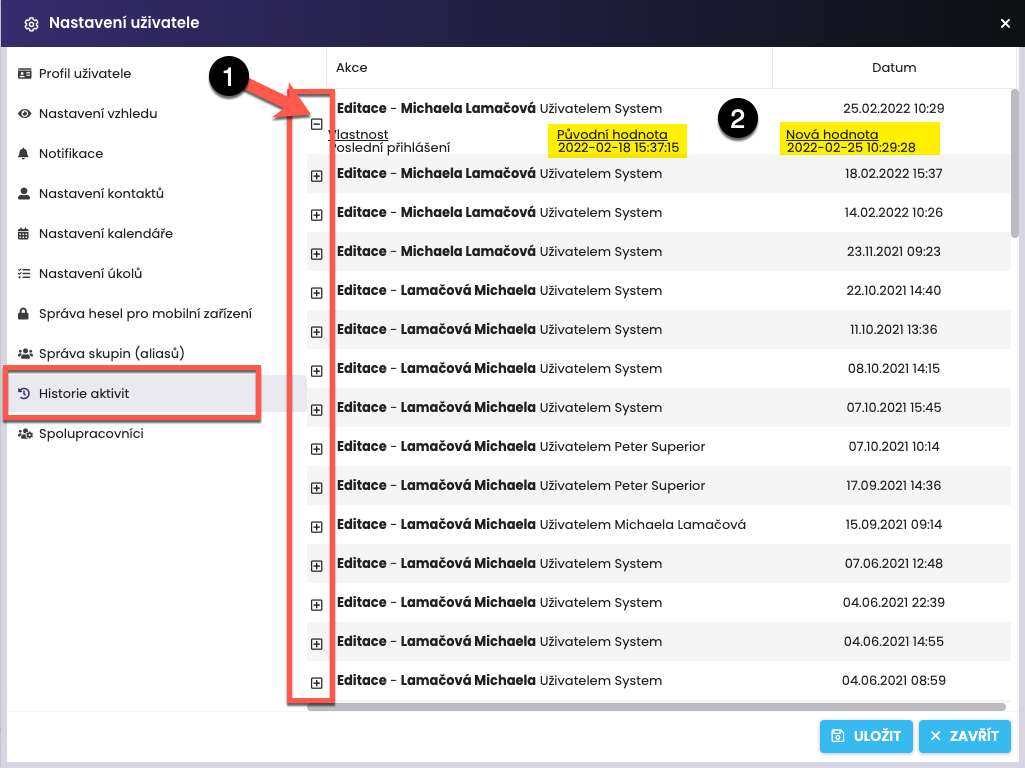
In the Activity History tab, you can see what the logged-in user has edited in the system and when the modification was made (date and time). When expanding the plus sign (1) for a particular activity, a record of the original and the new value (2) is displayed.
